You need to label your products quickly, but individual stickers are too slow to peel, and rolls feel too bulky for your current setup. You are searching for a labeling solution that balances professional quality with speed and ease of use.
Sheet labels are adhesive stickers printed on a flat piece of backing paper, usually A4 or Letter size, containing multiple labels on a single page. They are "kiss-cut," meaning the sticker is cut through while the backing stays intact, making them the industry standard for efficient manual labeling.
If you have ever struggled with peeling the backing off a single die-cut sticker, you know how frustrating it can be when you have 500 jars to finish. Sheet labels solve this problem instantly. Before you place your next order, let me explain exactly how this format works and why it might be the secret weapon your small business needs to save time and money.
What do sheet labels look like?
You might worry that "sheet labels" implies those cheap, paper-thin office labels you buy at a stationary store. You need to know if they can look premium enough for your specific brand image.
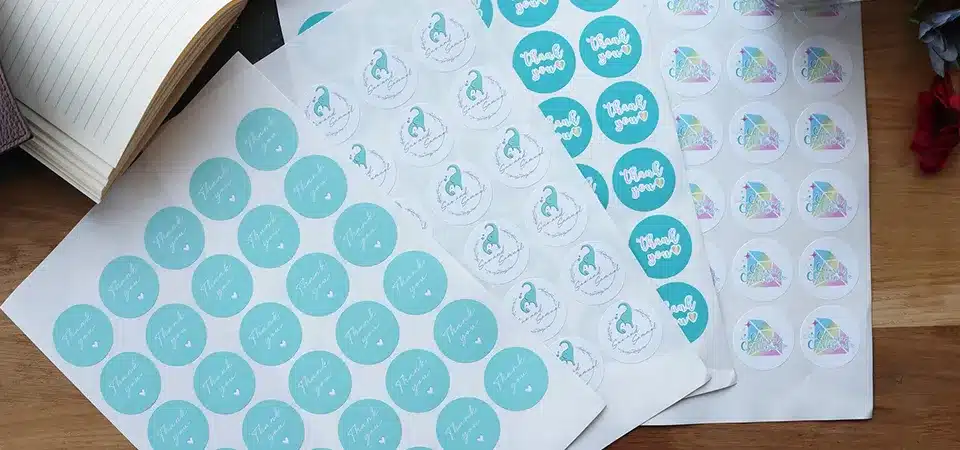
Professional sheet labels look clean and uniform, featuring your custom designs arranged in a neat grid or pattern on a high-quality liner. The waste material between the stickers is often removed, leaving only your perfectly shaped labels ready to be lifted off and applied.

When I inspect a batch of sheet labels here in our production facility, the first thing I look for is the quality of the "kiss cut." This is the most important visual feature of a professional sheet label. It means the digital blade has cut precisely through the sticker material—whether it is vinyl, paper, or textured stock—but stopped exactly before cutting the backing paper. This creates a sheet that feels solid in your hand but allows the sticker to pop off effortlessly.
Visually, sheet labels appear much more organized than other formats. Unlike loose die-cut stickers that come in a bag, sheets arrive in a neat stack, often shrink-wrapped. Depending on your design, you will see one of two common layouts:
- The Standard Grid: If you have rectangular or square circles, we line them up with a tidy, even gap between each sticker. This looks very uniform and makes it easy to count your inventory at a glance.
- The Custom Nest: If your label is a unique shape, like a star, a heart, or a complex logo, we arrange them to fit as many as possible on the page like puzzle pieces.
Another key visual detail is the "bleed." On professional sheets, you will see that the color of your design extends slightly past the cut line. This ensures that when you peel the sticker, there is no ugly white rim on the edge. Unlike the blank templates you print at home, custom printed sheets from a shop like ours can have different finishes, such as a glossy sheen that catches the light, a soft matte finish that feels like silk, or even a clear material that makes the text look like it is floating on the liner.
What size are your sheet labels?
You are confused about whether "size" on the order form refers to the piece of paper or the actual sticker itself. You fear that your specific product dimensions won't fit on the standard sheet sizes that printers offer.
The term "sheet size" usually refers to the carrying paper, typically A4 or US Letter, while the "individual label size" can be fully customized to fit your product. We fit as many of your specific labels as possible onto that standard sheet size.

This is a conversation I have with clients almost every day. There is a big difference between the canvas (the sheet) and the art (the label). Generally, in the printing world, we use standard paper sizes for the sheets because they are easy to handle, easy to ship, and fit into standard file folders.
Here is how we break down the sizing logic:
The Sheet Size
We usually print on A4 (210 x 297 mm) or US Letter (8.5 x 11 inches). These are the global standards. They fit in standard envelopes and boxes, which keeps your shipping costs low and prevents damage during transit. We do offer custom-sized sheets if you need them to fit into a specific retail package, but A4 is the most economical choice.
The Label Size
This is entirely up to you. Whether you need tiny 10mm dots for color-coding or large 100mm x 150mm rectangles for shipping boxes, we simply adjust the digital layout. To help you interpret how many stickers you will actually get, look at this simple breakdown of how many labels usually fit on a standard A4 sheet:
| Your Label Size | Approx. Labels Per Sheet | Best Use Case |
|---|---|---|
| 1 inch (25mm) Circle | 40 - 60 labels | Lid stickers, logo seals, promo items |
| 2 inch (50mm) Circle | 12 - 15 labels | Candle jars, coffee bags, cosmetic pots |
| 2x3 inch Rectangle | 8 - 10 labels | Soap bars, shampoo bottles, food pouches |
| 4x6 inch Rectangle | 2 labels | Shipping labels, large pouches |
We calculate the necessary "safety gap" (usually 2-3mm) between stickers to ensure the machine cuts accurately. So, you do not need to worry if your label will "fit." If your sticker is smaller than a piece of paper, we can put it on a sheet.
The advantages of sheet labels
You are tired of dealing with rolls that unravel all over the floor or loose stickers that get lost in drawers. You want a system that actually helps your team work faster and keeps your inventory organized.
Sheet labels are the ultimate choice for operational efficiency. They allow for rapid-fire application because you can peel them quickly with one hand, and they stack flat for easy storage in folders or boxes, taking up minimal space in your workspace.

When I talk to business owners, I always ask them, "How do you apply your labels?" If the answer is "by hand," I almost always recommend sheets. There are two massive advantages here that really change how you run your daily operations.
Speedy application
If you use individual die-cut stickers, you have to peel the back off every single one. That takes maybe 5 to 10 seconds per unit because you have to pick at the edge with your fingernail. With a sheet label, you can use the "bend and flick" method. You hold the sheet, bend it slightly backward, and the edge of the label pops up. You grab it and stick it.
You can label a jar in under 2 seconds. When you are doing 500 candles for a holiday rush, that time difference is huge. It is the difference between finishing at 5 PM and finishing at midnight. The sheet acts as a steady base, allowing your hand to develop a rhythm that you just cannot achieve with loose stickers.
Easy storing and distribution
Space is money, especially in small workshops. Rolls are round and awkward; they need special racks, or they roll off the table and get damaged. Individual stickers get scattered, bent, or lost. Sheets are flat. You can put 1,000 labels in a neat stack that is less than an inch high. You can store them in a standard file folder or a desk drawer.
Also, think about your team. If you have three people labeling products, you can simply hand each person 10 sheets. It is so much easier to count and share the workload compared to passing a heavy roll back and forth or counting out hundreds of loose stickers.
When to use sheet labels
You are torn between ordering rolls, sheets, or singles. You don't want to make the wrong choice and end up with a format that slows down your production line or wastes your budget.
You should use sheet labels if you are applying them by hand and your order quantity is between 50 and 10,000 pieces. They are the most cost-effective and practical option for small to medium businesses, limited edition runs, and seasonal product packaging.

Choosing the right format is about matching the label to your equipment and your current business stage. In my experience, sheet labels are the "sweet spot" for 90% of small businesses. They bridge the gap between hobbyist printing and industrial manufacturing.
Here is a critical checklist to help you decide if sheets are right for you:
Manual vs. Machine Application
If you or your staff stick labels on by hand, sheets are the clear winner. However, if you have a labeling machine that spins the bottle and applies the label automatically, you must use rolls. Sheets simply will not work in those machines. But for hand-labeling, sheets are faster than rolls because rolls tend to curl, making the sticker fight against you.
Order Quantity
If you need fewer than 50 labels, individual die-cuts might be fun, but sheets are still often cheaper. If you need 50,000, rolls become cheaper per unit because we can run them faster on our presses. But for that middle ground—where most growing brands live—sheets offer the best price performance. You avoid the high setup fees of rolls but get a much better price than singles.
Product Variety
Do you have five different scents of soap? With sheets, we can easily print 100 of each scent. This is called "variable data" or "multiple versions." Setting up five different rolls for such small numbers is remarkably expensive due to machine setup costs. Sheets give you the flexibility to test new products without committing to thousands of labels.
Conclusion
Sheet labels are the most practical tool for growing businesses, offering a perfect balance of fast hand-application, easy storage, and professional appearance to ensure your products look their best.


