Skip to content
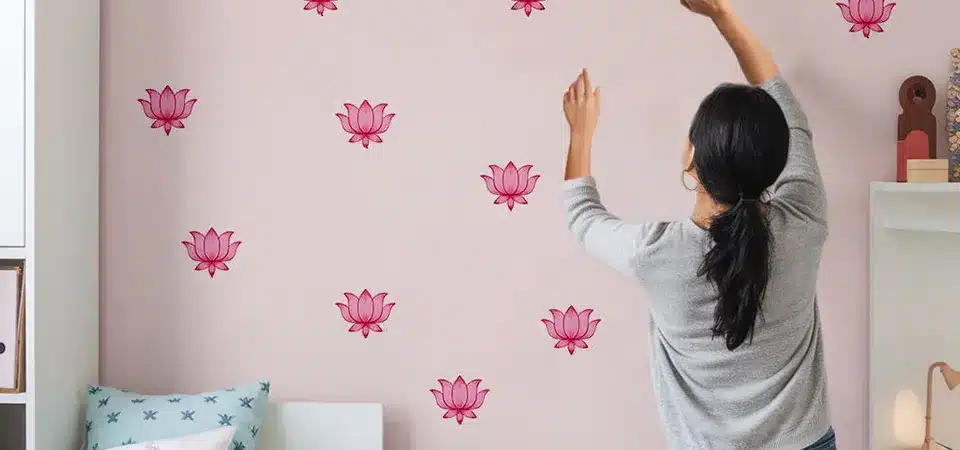
You want to decorate, but the terms "sticker" and "decal" are confusing. Choosing the wrong one could mean a cheap look, a tricky application, or even damaged walls.
A wall sticker is typically a single printed piece you peel and stick, ideal for simple shapes. A wall decal has three layers (backing, vinyl, transfer film) for applying intricate, detailed designs, giving a cleaner, "painted-on" look without a clear background.
In my printing business, I see people use these terms interchangeably almost every day, but they are very different products. Honestly, the real difference isn't just in the name or how they look at first glance; it's about how they're made and, most importantly, how you apply them to your wall. Understanding this is the key to getting that perfect look you're picturing in your head. Let's break down exactly what each one is so you can choose with confidence.
What Are Wall Stickers and Wall Decals?
You see cool graphics on walls online, but you don't know what they are. This makes it impossible to search for the right product or explain what you want.
A wall sticker is a single-layer design printed on vinyl that you peel off a backing and stick on the wall. A wall decal is a three-layer system designed to transfer complex, cut-out shapes and letters onto a wall precisely.

To really get it, you have to think about their construction. In my shop, we handle both materials, and they are fundamentally different.
The Simple Wall Sticker
Think of a classic sticker, just bigger. A wall sticker consists of two layers:
- The Vinyl Layer: This is where your design is printed. It's a single piece of vinyl.
- The Backing Paper: The vinyl sits on this waxy paper, which you peel off to expose the adhesive.
Because it's a single piece, wall stickers are best for simple, contained shapes—like polka dots, cartoon characters for a kid's room, or a rectangular logo. If there's any "negative space" inside the design, it will be filled with a clear or white vinyl background. They are designed for quick and easy decoration.
The Sophisticated Wall Decal
A wall decal is a more advanced product with three layers:
- The Backing Paper: This is the bottom layer, just like a sticker.
- The Vinyl Decal: This is the actual design, but it’s often made of many separate pieces (like individual letters in a quote).
- The Transfer Film: This is the crucial top layer. It's a slightly sticky, semi-clear sheet that holds all the separate pieces of the design together in perfect alignment.
The transfer film is the magic component. It allows you to lift an intricate design with many parts off the backing paper, place it on the wall in one go, and then peel the film away, leaving only the vinyl design behind. This is how you get that clean, "painted-on" look with lettering or complex shapes like a tree with individual leaves.
How Are Stickers And Wall Decals Applied?
You're excited to put your new graphic on the wall but secretly terrified. You're worried you'll get it crooked, trap a bunch of ugly bubbles, or ruin the whole thing.
Wall stickers use a simple peel-and-stick method. Wall decals require a multi-step transfer process: you position the decal, rub (burnish) to transfer it to the wall, then peel away the top transfer layer, leaving only the design.

The application process is the biggest practical difference between these two products. One is almost foolproof, while the other requires a little more patience and care.
Applying a Wall Sticker: The Peel-and-Stick Method
This is as easy as it gets.
- Clean the Wall: Wipe the surface with a dry cloth to remove any dust.
- Peel: Gently peel the sticker off its backing paper.
- Stick: Position it on the wall and press it down.
- Smooth: Using your hand or a credit card, smooth from the center outwards to push out any air bubbles.
It's a quick, one-person job that takes minutes.
Applying a Wall Decal: The Transfer Method
This process is more involved but gives a much more professional result.
- Clean the Wall: Make sure the surface is clean and completely dry.
- Position: Don't peel anything yet. Tape the entire decal to the wall with painter's tape to find the perfect spot.
- Burnish: Using a squeegee or a credit card, firmly rub the entire surface of the top transfer film. This sticks the vinyl design to the film.
- Remove Backing: Carefully peel away the bottom backing paper, making sure the vinyl design stays on the transfer film.
- Apply to Wall: Press the transfer film (with the design attached) onto the wall. Burnish it again, this time to stick the vinyl to the wall itself.
- Remove Transfer Film: Slowly peel the top transfer film away at a sharp angle. The vinyl should stay on the wall, leaving a perfect, clean design.
| Feature | Wall Sticker | Wall Decal |
|---|---|---|
| Steps | 2-3 | 5-6 |
| Tools | Hands | Squeegee/Credit Card, Tape |
| Difficulty | Easy | Medium |
| Best For | Simple Shapes | Intricate Designs, Text |
How Long Do Wall Decals Last?
You’re investing time and money into decorating your space. You need to know if your new wall art will start peeling and fading in a few months or look great for years.
A high-quality vinyl wall decal or sticker, applied correctly to a proper indoor surface, will last for 5 years or more. Longevity depends on the vinyl quality, sun exposure, and the condition of the wall surface.

As a printing professional, I can tell you that not all vinyl is created equal. The lifespan of your wall graphic depends heavily on the quality of the materials we use. For wall products, we specifically use indoor-grade vinyl with a matte finish that's designed to last.
Factors That Affect Lifespan:
- Vinyl Quality: We use high-performance calendared vinyl designed for indoor use. Cheaper-quality vinyl from some online marketplaces can become brittle and start to peel or crack within a year.
- Sunlight: Direct, intense sunlight can cause the colors of any printed graphic to fade over time. For a decal on a wall that gets hit with direct sun all day, you might see some fading after 3-4 years. On a wall with indirect light, it can look perfect for 7 years or more.
- Surface and Application: A decal on a smooth, clean, properly painted wall will last much longer than one on a textured or dusty surface. A good, firm application with a squeegee ensures the adhesive makes a strong bond, preventing the edges from peeling up over time.
- Humidity: In very damp environments, like a bathroom, the constant moisture can weaken the adhesive over time. While decals are water-resistant, a bathroom without good ventilation might shorten a decal's lifespan to 2-3 years.
In most typical home or office environments, you can expect to enjoy your wall sticker or decal for at least five years before you even think about replacing it.
Are Wall Decals Permanent?
You like the idea of a wall decal, but you're a renter or you like to change your decor often. You're worried it will be a permanent choice that you'll regret later on.
No, wall decals are not permanent. They are designed to be removable. While they have a strong adhesive to last for years, you can remove them without damaging the wall, usually by applying gentle heat from a hairdryer.

This is a huge selling point and a common concern for my customers. Think of wall decals as long-term temporary decorations. They are built to stay put for as long as you want them, but you have an exit strategy when you're ready for a change.
The Removal Process
The adhesive is strong, but it's not super glue. The bond can be released cleanly. Here’s the method I always recommend:
- Apply Gentle Heat: Use a standard hairdryer on a low or medium heat setting. Hold it a few inches from the edge of the decal and warm it up for about 15-20 seconds. This softens the vinyl and, more importantly, softens the adhesive underneath.
- Lift an Edge: Once the vinyl is warm and pliable, use your fingernail or a small plastic scraper to lift one of the corners.
- Peel Slowly: Pull the decal away from the wall slowly, at a sharp angle (close to 180 degrees). If it feels too stuck, apply a little more heat as you go.
This simple process allows the decal to come off cleanly without pulling paint with it. It's designed specifically for this purpose, giving you the freedom to decorate without the commitment of paint.
Do Decals Ruin Walls?
You want to use a decal, but your biggest fear is that when you remove it, it will pull off a huge chunk of paint and drywall, leaving you with an expensive repair job.
When applied to a properly prepared and cured wall, a quality wall decal will not ruin the wall or damage the paint upon removal. Issues typically only arise if the paint was fresh, of poor quality, or the wall was damaged beforehand.

This is the most critical question for homeowners and renters. The answer is almost always no, if you follow the rules. In my experience, 99% of wall damage incidents happen for preventable reasons.
How to Guarantee a Damage-Free Experience
- Let Your Paint Cure: This is the most important rule! Just because paint is dry to the touch doesn't mean it's fully cured. Curing is the chemical process where the paint bonds to the wall. This takes time—at least two weeks, and I recommend a full 30 days for new paint before applying any decal. Applying a decal to uncured paint is the #1 cause of damage.
- Know Your Surface: Decals work best on smooth walls with standard paints like satin or semi-gloss latex. Very matte or flat paints can be trickier, as the adhesive can bond more strongly to the porous paint surface. Heavily textured walls (like stucco or orange peel) are not ideal, as the decal can't make full contact.
- Use Heat for Removal: Don't just rip the decal off the wall. As mentioned before, using a hairdryer is the secret. It softens the glue, a lot. This simple step changes the removal from a pull to a gentle release, protecting the paint underneath.
- Clean and Prime First: If your wall is old, flaking, or was never primed properly before painting, a decal's adhesive can be stronger than the paint's bond to the wall. Make sure you're starting with a solid, well-prepared surface.
If you follow these guidelines, you can be very confident that your decal will be a beautiful, and completely temporary, addition to your decor.
Conclusion
Stickers are for quick, easy decoration. Decals are for intricate, professional-looking designs. Choose the one that best fits your design complexity and desired finish for perfect results.