You have a plain laptop, a scratched-up skateboard, or a boring car part. You want to give it a blast of personality, but a custom paint job is expensive and permanent.
Sticker bombing is the art of covering a surface with many overlapping stickers to create a bold, eye-catching collage. To do it properly, use durable vinyl stickers, thoroughly prepare the surface, layer the stickers to cover all gaps, and protect the final design with a clear coat.
As someone who lives and breathes stickers, I see sticker bombing as the ultimate form of personal expression. It's a way to turn an everyday object into a one-of-a-kind piece of art that screams "you." But there's a real difference between a messy, peeling attempt and a smooth, durable masterpiece. It’s not just about slapping on some stickers; there’s a process to it. Let's walk through everything you need to know to create a sticker bomb that looks amazing and lasts for years.
All you need to know about sticker bomb?
You see those incredible, sticker-covered cars and laptops online. It looks like chaotic fun, but you worry that if you try it, your project will just end up looking cheap and messy.
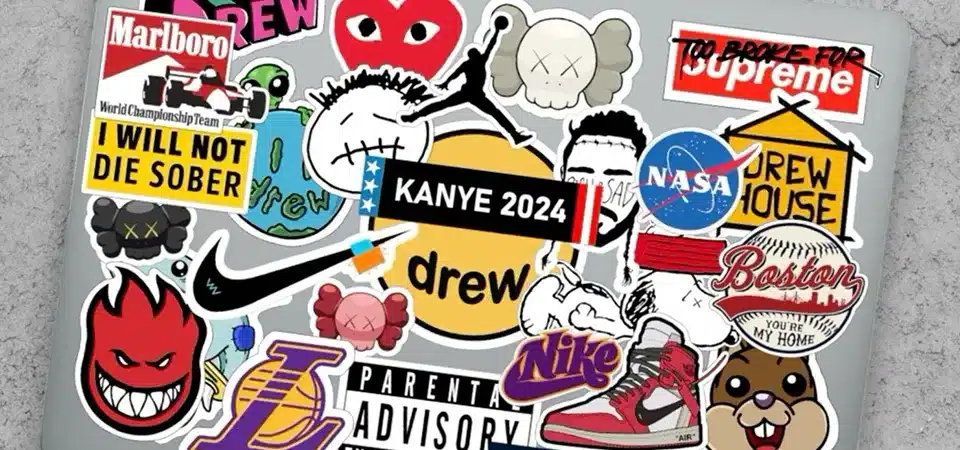
Sticker bombing is a visual art style with roots in street art and car culture. It involves completely covering an object with a dense collage of overlapping stickers, transforming it into a single, textured piece that showcases your personality and interests.

Understanding the "why" behind sticker bombing helps you create a better result. It's about more than just decoration; it's a statement. In my business, we print stickers for so many different subcultures, and sticker bombing is a common thread that brings them together.
What is sticker bombing?
Sticker bombing is the practice of creating a full-coverage collage with stickers. The key is overlapping. You aren't just placing individual stickers; you're layering them to create a single, cohesive skin. It comes from the JDM (Japanese Domestic Market) car scene and skateboarding culture, where people used it to personalize their rides or cover up dings and scratches. The goal is to create a piece with so much visual information that you can always find something new to look at.
Why do sticker bomb?
People sticker bomb for many reasons. It's a powerful way to personalize your belongings. It can cover up imperfections like scratches on a car fender or a scuff on a laptop. It's also a form of artistic expression, letting you show off your favorite brands, artists, movies, or just designs you think are cool. And compared to a professional paint job, it's a much cheaper and less permanent way to customize your gear.
What should I Sticker bomb?
You can sticker bomb almost anything with a smooth, non-porous surface. Popular choices include:
- Laptops and tablets
- Game consoles
- Skateboards and snowboards
- Car parts (fenders, interior trim, mirrors, roof racks)
- Water bottles and flasks
- Toolboxes and mini-fridges
- Furniture like desks or shelves
If you’re new to this, my advice is to start with something small and relatively flat, like a phone case or a hardback notebook, to get the technique down before moving on to a complex, curved object like a motorcycle helmet.
What types of sticker can be used for sticker bombing?
This is the most critical part: you must use high-quality vinyl stickers. As a sticker expert, I can't stress this enough. Paper stickers will absorb moisture, tear easily, and fade in days. Waterproof vinyl stickers are durable, flexible, and made to last. For the best result, gather a variety of sizes (large, medium, and small), shapes, and colors. This variety is what will allow you to fill every tiny gap and create a dynamic, layered look.
How do you create the perfect sticker bomb?
You’ve gathered an awesome collection of stickers and picked out the perfect object. But now you're staring at it, unsure of where to even begin to avoid a lumpy, peeling disaster.
To create the perfect sticker bomb, you must follow four key steps. First, prepare the surface by cleaning it thoroughly. Second, plan your layout. Third, apply the stickers by overlapping them carefully. Finally, seal your finished work to protect it.

Creating a great sticker bomb is all about a good process. Rushing it is the number one mistake I see. A little patience and preparation will make all the difference between a project that falls apart in a month and one that lasts for years. Here are the exact steps I recommend to everyone.
Step 1: Prepare the surface
This is a step you cannot skip. The surface must be perfectly clean for the sticker adhesive to bond properly. Wipe the entire area down with isopropyl (rubbing) alcohol and a clean cloth. This removes any oils, wax, or dust. If it's very dirty, you can use mild soap and water first, but make sure you rinse it well and let it dry completely. Any moisture or dirt left behind will cause your stickers to fail and peel.
Step 2: Prepare your stickers
Gather all your stickers in one place. Make sure you have more than you think you’ll need—it's always better to have extra options. A good mix of large, medium, and small stickers is crucial. The big ones are your foundation, the medium ones are your main fillers, and the tiny ones are essential for plugging all the little gaps that will appear.
Step 3: Arrange and apply stickers
Start with your biggest and favorite stickers. Place them in the most prominent areas. Don't be afraid to cover parts of them up later. Now, start filling in the spaces around them with your medium-sized stickers. The most important rule is to overlap every edge. No part of the original surface should be visible. Use your smallest stickers to fill in the final awkward gaps. As you apply each sticker, press down firmly from the center out to push out any air bubbles. If you’re working around a curve or edge, a little heat from a hairdryer can make the vinyl more flexible.
Step 4: Seal your sticker bomb
This is the professional secret to making your work last. Once all your stickers are applied and pressed down, you need to protect them. Use a clear acrylic spray sealant, which you can find at any hardware or craft store. In a well-ventilated area, apply 2-3 light, even coats over the entire surface, letting each coat dry for about 15-20 minutes in between. This clear coat makes your sticker bomb waterproof, UV-resistant, and scratch-resistant, and it locks down all the edges to prevent peeling. You can choose a gloss finish for a shiny look or a matte finish for a modern, flat look.
What are the common questions about sticker bombing?
You've just finished your awesome project, and it looks great. But now you have some lingering questions about how to care for it, its legality, and where to get more supplies.
Common questions focus on durability, legality, and sourcing. You prevent peeling with a clear coat, it's legal only on your own property, and the best stickers come from online marketplaces, artists, and custom printers.

It’s smart to think about the long-term life of your project. As a business owner, I answer these questions all the time. Let’s clear up the most common points so you can enjoy your creation with confidence.
How do you keep a sticker bomb from peeling?
Peeling is the number one enemy. The best defense is a great offense, which means following the steps we just covered. To recap:
- Start with a perfectly clean and dry surface.
- Use high-quality, waterproof vinyl stickers.
- Press every sticker down firmly, especially the edges.
- Seal the entire thing with a clear acrylic spray coat. This final step is the most important for locking everything down and preventing edges from lifting.
Do I need to clear coat a sticker bomb?
I would say it is highly recommended. If your sticker bomb is on something that will never be touched, rained on, or see sunlight (like the back of a picture frame), you could probably skip it. But for anything that will be handled or exposed to the elements—like a laptop, water bottle, car, or skateboard—a clear coat is essential. It's the difference between a project that looks good for a few months and one that looks good for several years.
Is sticker bombing illegal?
This is a very important distinction. Sticker bombing your own personal property is 100% legal. Decorate your car, your laptop, your toolbox—anything you own is fair game. However, applying stickers to public property (like stop signs, benches, or utility boxes) or someone else's private property without permission is considered vandalism or graffiti, and it is illegal. Keep the art on your own stuff.
Where to buy stickers for sticker bombing
Building a great collection is part of the fun! You need variety, so don't just buy from one place.
- Online Marketplaces: Sites like Amazon sell large, affordable sticker packs with hundreds of assorted designs.
- Artist Shops: Platforms like Etsy and Redbubble are fantastic for finding unique, high-quality stickers designed by independent artists.
- Social Media: Many artists sell stickers directly through Instagram. It's a great way to support them.
- Custom Printers: For a truly personal touch, you can have your own designs printed by a company like mine. This is great if you want to include photos, logos, or your own artwork.
Conclusion
Sticker bombing is a fantastic and accessible way to customize your gear. Just remember to use quality vinyl stickers, prepare your surface properly, and seal your work with a clear coat.


