Skip to content
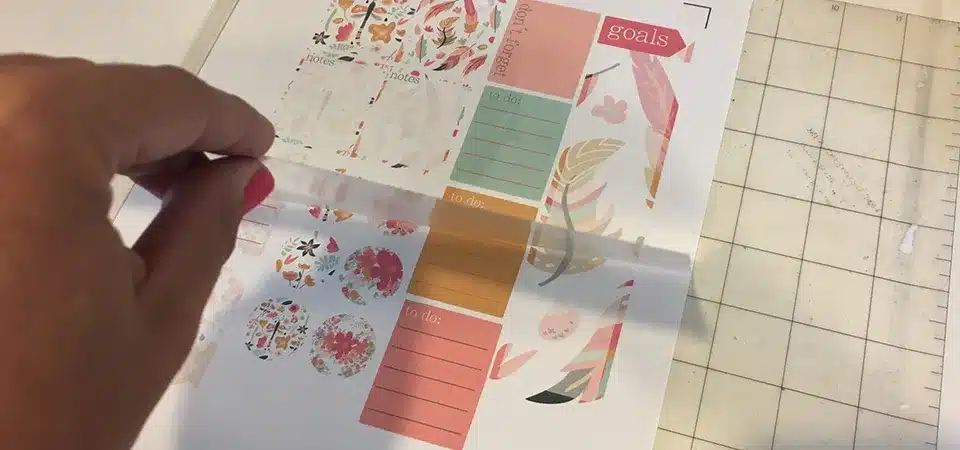
Your amazing stickers look great at first, but then they get scratched, faded, and ruined by water. It’s a shame to see your favorite designs wear out so quickly.
The best way to laminate stickers is by using a thermal laminator and heat pouches for a professional, durable finish. For DIY projects, self-adhesive sheets or a clear spray sealant add a protective layer against water, scratches, and UV fading, making your stickers last much longer.
As a professional sticker printer, I can tell you that the secret to a long-lasting sticker isn't just the vinyl—it's the protection on top. Lamination is a clear layer that acts as a shield. It defends your sticker's ink from sunlight, repels water, and resists scratches from daily use. A sticker without a laminate is like a phone without a case; it’s just a matter of time before it gets damaged. But there are many ways to laminate, from professional machines to simple household hacks. Let's look at the options so you can give your stickers the armor they deserve.
What are the best ways to laminate your stickers?
You want to protect your stickers, but the options seem complicated. You're not sure if you need a machine, special sheets, or just a can of spray from the hardware store.
You can laminate stickers with a thermal machine for the toughest results. For an easier DIY method, use self-adhesive lamination sheets. A laminating spray offers quick protection, while packing tape or clear contact paper are simple budget options.

When clients ask how we make our stickers so tough, the answer is always lamination. We use professional methods, but you can get great results at home, too. It all comes down to applying a clear, protective layer over your printed sticker sheet before you cut the stickers out. Each method has its own process, but the goal is the same: to create a shield that keeps the design underneath looking perfect. Let's break down the five most common ways to do it.
1. Laminating machine
A thermal laminator uses heat and pressure to seal a sticker sheet inside a plastic pouch. This is the method we use in our shop for the most durable results. You place your sheet of stickers inside a special two-sided laminating pouch and feed it through the hot machine. The heat activates the adhesive in the pouch, creating a rigid, waterproof, and scratch-proof seal. This is the gold standard for professional-quality stickers that need to survive on cars, water bottles, and outdoor gear.
2. Self-adhesive sheets
These are often called "cold laminate" sheets because they don't require a machine. They are simply large sheets of clear, sticky vinyl. You lay your sticker sheet flat, then carefully apply the self-adhesive sheet over the top, smoothing it down as you go. I always recommend using a squeegee or a credit card to press it down firmly and remove any air bubbles. This method gives you a beautiful, durable finish that's very close to what a machine can do. It's my top recommendation for serious DIY sticker makers who want quality without buying a machine.
u a beautiful, durable finish that's very close to what a machine can do. It's my top recommendation for serious DIY sticker makers who want quality without buying a machine.
3. Laminating spray
A laminating spray is a clear acrylic sealant that comes in an aerosol can. You typically find it in craft or hardware stores. To use it, you lay your sticker sheet flat in a well-ventilated area and apply one or two light, even coats of the spray. It creates a thin protective layer that adds decent water and UV resistance. It's great for stickers with very intricate shapes where applying a sheet would be difficult. However, the protection is much thinner and less durable against scratches compared to a sheet or thermal lamination.
4. Packing tape
This is the ultimate budget lamination hack. It works best for smaller, individual stickers. You simply place a piece of high-quality, clear packing tape over your sticker. Press it down firmly and trim the edges. While this trick is cheap and easy, it's not a long-term solution. The tape's adhesive can yellow over time, and it offers minimal protection against heavy use or water. It's a fun method for kids' crafts or personal projects where top-tier durability isn't the main goal.
5. Clear contact paper
Clear contact paper is like a larger, less aggressive version of a self-adhesive laminating sheet. It's a staple in many kitchens for lining shelves, and it works surprisingly well for laminating. You apply it just like a self-adhesive sheet, smoothing it over your sticker designs before cutting. It's very affordable and great for covering large areas. The main downside is that contact paper is usually thinner and softer than proper laminate sheets, so it offers less protection against deep scratches. It’s a great entry-level option for crafters.
How do you choose the right laminating method for your needs?
You've seen the different options, but now you need to decide. Choosing the wrong one could mean wasting money on a machine you don't need or getting a sticker that doesn't last.
Choose a laminating machine if you're selling professional stickers. Use self-adhesive sheets for high-quality personal projects. Pick a spray for speed, and use packing tape or contact paper for budget-friendly crafts where durability is less critical.

The best method for you really depends on your goals, your budget, and how much toughness you need. There's no single "best" way; there's only the best way for your project. I help clients make this choice all the time. Are you starting a business, or just making stickers for your own journal? Does the sticker need to survive a dishwasher, or just sit on a shelf? Let's look at the strengths and weaknesses of each option to help you decide.
1. Laminating machine
This is your choice if you are starting a sticker business or need the absolute best durability. We rely on our machines to produce stickers that stand up to years of abuse. The finish is perfectly smooth, rigid, and completely waterproof. The downside is the cost of the machine and the pouches. It's an investment.
2. Self-adhesive sheets
This is my top recommendation for most DIYers who want professional results. The sheets are more affordable than a machine and give you a thick, protective layer that's great for water bottles and laptops. The main challenge is applying it perfectly without getting air bubbles or dust trapped underneath. It takes a bit of practice to master.
3. Laminating spray
Choose a spray when speed is your priority or when your stickers have lots of tiny, separate parts. It’s very fast to apply an even coat over a whole sheet. However, the protection is much lighter. It adds a good bit of UV and moisture resistance, but it won't save a sticker from a key scratching against it in a pocket. Also, you must use it outdoors or in a ventilated space because of the fumes.
4. Packing tape
This is the choice for a quick, cheap fix or a kids' craft project. It’s readily available and costs almost nothing. But I would never use it for a sticker I want to last. It's just not durable, the edges can peel easily, and the tape itself is not as clear as a real laminate.
5. Clear contact paper
This is the go-to for hobbyists on a budget who are making large stickers or many stickers at once. A roll of contact paper is cheap and covers a lot of ground. It’s perfect for temporary decorations, planner stickers, or things that won't see a lot of wear and tear. Just don't expect it to perform like a true vinyl laminate.
| Method | Durability | Cost | Ease of Use | Best For |
|---|---|---|---|---|
| Laminating Machine | Highest | High | Medium | Selling professional stickers |
| Self-Adhesive Sheets | High | Medium | Medium | Quality DIY projects, water bottles |
| Laminating Spray | Medium | Low | Easy | Quick protection, intricate designs |
| Contact Paper | Low | Very Low | Easy | Large craft projects, temporary use |
| Packing Tape | Very Low | Very Low | Easy | Kids' crafts, quick fixes |
FAQs
Can I laminate a sticker that's already on a surface?
No, lamination is done before the sticker is cut out from its backing paper. You need to apply the laminate to the flat sticker sheet. Trying to laminate a sticker already on a curved bottle or laptop is practically impossible to do cleanly.
Does lamination really make a sticker waterproof?
It makes the top surface of the sticker 100% waterproof. However, a sticker's true weakness is its edges. If water gets under the edge of the sticker and vinyl, it can degrade the adhesive. A well-laminated and well-applied sticker will be highly water-resistant, but no sticker is truly "waterproof" forever if submerged.
What’s the difference between "cold" and "thermal" lamination?
Thermal lamination uses heat to activate a special adhesive inside a plastic pouch, creating a very strong, rigid bond. Cold lamination uses pressure-sensitive adhesive, like a sticker on a sticker. You just press it on, no heat required. Self-adhesive sheets and contact paper are forms of cold lamination.
Conclusion
Laminating adds a vital shield to your stickers. Choose the right method for your budget and durability needs, and you'll keep your designs looking crisp and vibrant for much longer.